
The Course Launch Checklist: From Idea to First Sale
Launching a course can feel overwhelming, especially if you are starting from zero. There are tools to choose platforms, learn funnels, and create content, but it is easy to jump straight into recording videos without laying the right foundation.
This guide is your step-by-step roadmap to launching your course properly from idea to first sale. Instead of guessing your way through the process, you will follow a proven framework focused on clarity, alignment, and execution. Each phase builds on the last, so you are not skipping steps or wasting effort on things that will not move the needle.
You do not need a massive audience or a perfectly polished brand to launch successfully. You need a clear transformation, a simple funnel, and a plan you can actually follow.
Phase 1: Pre-Launch Foundation
Before You Build Anything
Before you write a single lesson or open a course platform, you need clarity. This phase determines whether your course will sell or struggle.
Start by identifying the exact transformation your course delivers. This is not about what you teach but what changes for the student. Ask yourself what specific result someone will experience after completing your course. Your course promise should be clear enough to fit into one sentence and specific enough that the right person immediately recognizes themselves in it.
Next, define who the course is for. Be precise. A course for burned-out coaches making under 5K a month is clearer and more compelling than a course for anyone who wants success. The clearer your audience, the easier everything else becomes, including your messaging content and pricing.
To validate your idea, survey your target audience. Learn what they are struggling with, what they have already tried, and what they actually want to achieve. Look at demographics, interests, behavior,s and pain points. It is also important to identify their awareness stage. Are they aware of the problem but not the solution, or do they already know what kind of solution they are looking for?
Once you have this clarity, write down the number one problem your course solves. Then create clear learning objectives that align with what your audience wants to achieve. Decide how you will measure success. This could be skills gained, clarity achieved, or tangible results like revenue growth or time saved.
Clarity here prevents wasted effort later.
Course Creation
Structuring Your Course Content
With your foundation in place, you can now structure your course content with intention.
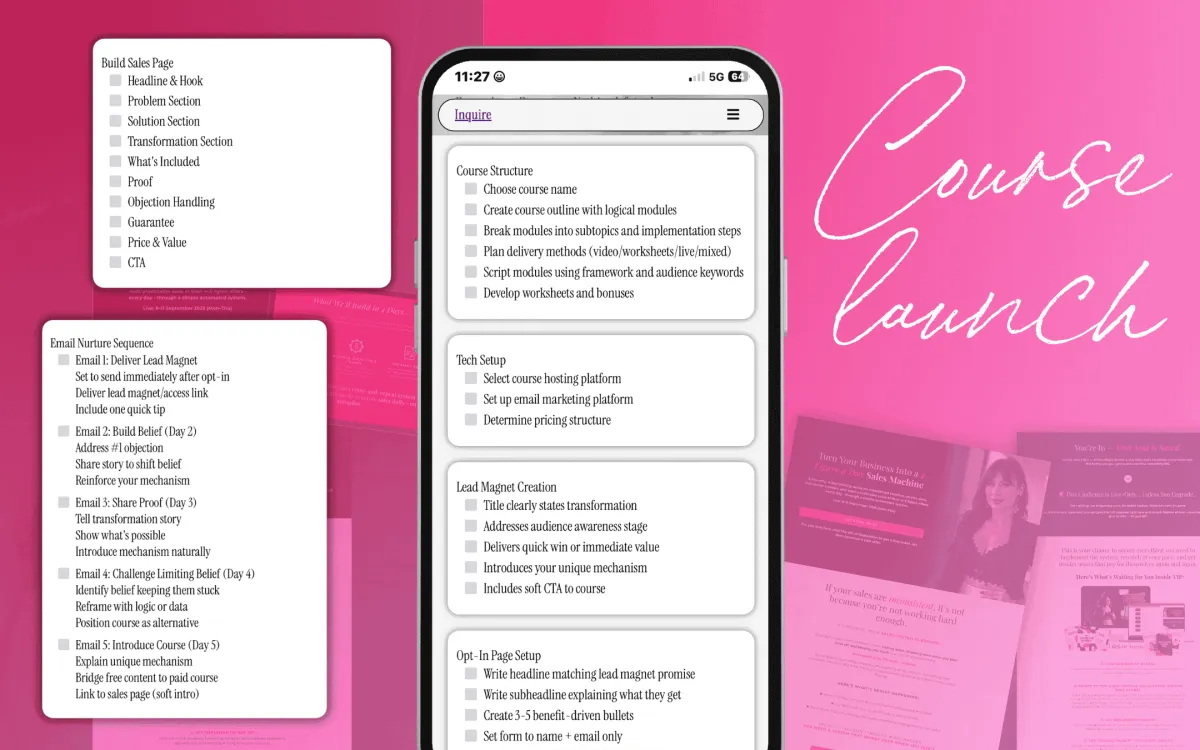
Choose a course name that clearly reflects the transformation. It should be descriptive and compelling, not clever at the expense of clarity. People should know what they get from the title alone.
Create an outline with logical modules that build on each other. Each module should represent a major step in the transformation. Break these modules into lessons that include strategies, tools, and implementation steps. This ensures your course is actionable, not just informational.
Decide how you will deliver the content. This could include video lessons, worksheets, live sessions, or a combination. Script your modules using your framework and the same language your audience uses. This builds connection and understanding.
Develop implementation materials such as worksheets, templates, and bonuses that help students apply what they learn. Courses that focus on action consistently outperform courses that focus only on theory.
Choosing Your Tech Stack
Your tech should support your strategy, not complicate it.
Choose a course-hosting platform that fits your needs, such as Kajabi, GoHighLevel, or Systeme.io. Set up an email marketing platform to nurture leads and communicate with students. Your email list is essential for launching and selling.
Determine your pricing structure based on the value of the transformation, not the number of lessons. Research what competitors charge for similar outcomes. Decide whether your course is low, mid, or high ticket, and price it accordingly.
If your course is priced above $500, consider offering a payment plan to reduce friction.
Setting Your Launch Timeline
Pick a firm launch date and work backwards. This creates urgency and focus. Build a promotional calendar that includes content emails and launch milestones. Identify the marketing channels that actually reach your audience whether that is social media, email, partnerships, or ads.
Set enrollment targets and revenue goals so you can measure success objectively instead of guessing how well the launch went.
Phase 2: Creating Your Funnel
A funnel is simply the path someone takes from discovering you to becoming a customer. Every part of the funnel has one clear purpose.
Your opt-in page exists to capture email addresses by offering a valuable lead magnet. This could be a video training guide, webinar, quiz, or workshop. The goal is to attract people who are genuinely interested in your topic.
After the opt-in, the tripwire, or the first one-time offer, follows. This is a low-priced product that solves the next logical problem and feels like a no-brainer. It should be directly related to the lead magnet.
Next is your email nurture sequence. Over five to seven emails, you build trust, shift beliefs, and prepare your audience for the course offer.
Your core offer is your flagship course. This is presented through a dedicated sales page that focuses on transformation outcomes and proof.
After checkout, the confirmation page directs the buyer to the next step, whether onboarding or upsells. If someone declines the core offer, a downsell page can offer a smaller course component at a lower price to increase lifetime value.
One-time offers work because they rely on true scarcity and urgency. The offer is available only for that moment and disappears when the page is closed. This structure maximizes the value of each visitor.
The first step in building this funnel is creating your lead magnet.
Creating a Lead Magnet
Choose one lead magnet that aligns with your audience's awareness stage and your teaching style. Options include a mini-course lesson preview, an interactive quiz, a workshop replay, a resource kit, or an email mini-course.
The key is relevance. Your lead magnet must logically connect to your paid course. If your course teaches community building, your lead magnet could be something like five questions to define your ideal member.
Focus on delivering a quick win. People should experience value almost immediately. This builds trust and increases conversions.
In another blog, I break down each lead magnet type and who it is best for.
A strong lead magnet has a clear title that states the result, addresses the audience's awareness stage, delivers immediate value, subtly introduces your unique mechanism, and ends with a soft call to action that bridges to your course.
Building Your Opt-In Page
Your opt-in page should be simple, focused, and distraction-free.
The headline must match the promise of the lead magnet. The subheadline explains what they will get and why it matters. Include a short list of benefits that show specific outcomes. The form should only ask for name and email, and the call to action should be benefit-driven.
Remove the navigation links and ensure the page is mobile-responsive. Social proof is optional but helpful if available.
You can build your opt-in page using platforms such as Kajabi, Systeme.io, ConvertKit, Leadpages, ClickFunnels, GoHighLevel, Squarespace, or Carrd.
A strong opt-in page leads with the transformation, highlights benefits, includes emotional triggers, builds authority, and keeps the barrier to entry low. It moves readers from problem awareness to solution introduction to action.
Email Nurture Sequence
Your email sequence warms your audience and prepares them to buy.
The first email delivers the lead magnet, confirms their subscription, and sets expectations. Include a quick tip but no pitch.
The second email addresses the biggest objection using a story or example and reinforces your mechanism.
The third email shares proof through a transformation story and introduces your course subtly.
The fourth email challenges a limiting belief and positions your course as the alternative.
The fifth email introduces your course clearly and links to the sales page with a soft invitation.
The sixth email is the direct pitch that addresses objections and adds urgency through bonuses or deadlines.
The final email is the last-chance reminder that reinforces urgency and addresses remaining objections.
Building Your Sales Page
Your sales page guides the reader from problem to solution to decision.
Start with a headline that speaks directly to their pain point and mirrors their internal dialogue. Clearly identify the problem and agitate it by showing the cost of staying stuck.
Introduce your unique mechanism and explain why it works differently. Show the before-and-after transformation with realistic outcomes.
Break down what is included in the course, including modules, bonuses, and value stacking. Add testimonials or your own transformation story if needed.
Handle objections through an FAQ section and include a clear guarantee to reduce risk. Anchor the price against the cost of doing nothing and offer payment plans if available.
Your call to action should appear multiple times and use consistent benefit-driven language.
Checkout Onboarding and Course Access
Your checkout page should only request essential information, clearly display pricing, and reinforce trust through guarantees and security indicators.
Choose a payment processor such as Stripe, PayPal, Kajabi Payments, ThriveCart, or SamCart. Set up one-time payments, payment plans, and optional upsells.
After purchase, your thank-you page confirms the order, explains the next steps, and optionally offers a quick win. The onboarding email provides access details, welcomes the student, and sets expectations.
Phase 3: Creating Your Course Content
You can structure your course in several ways.
A module-based course works best for step-by-step systems. A challenge-style course is ideal for implementation-focused audiences. A hybrid model works well for high-ticket programs that include live calls.
Each lesson should deliver one clear takeaway, be actionable, and include supporting resources. Keep videos concise and film in batches to stay consistent. Consider building a community space for collaboration.
Host your course on platforms such as Kajabi, Teachable, Kartra, Systeme.io, GoHighLevel, or a community plus Google Drive setup if you are on a budget.
Phase 4: Planning Your Launch Strategy
Choose a launch style that fits your goals.
Evergreen launches work well for automated income. Open-close launches create urgency and work best for higher-priced offers. Hybrid launches combine availability with limited-time bonuses.
Before launch, announce the date, tease content, send "coming soon" emails, and prepare ads if budget allows. During launch week, follow a clear email schedule that opens the cart, addresses objections, shares proof, and reinforces urgency.
Drive traffic through organic channels such as social media, email, SEO, podcasts, and live teaching. Paid traffic can accelerate results if you have the budget.
Track key metrics like opt-in rates, open rates, sales conversions, and checkout completion. Optimize based on where people drop off and real feedback.
Phase 5: Post-Launch Optimization
After launch, focus on delivering an exceptional student experience. Collect feedback, testimonials, and case studies. Update your sales page with real results.
Scale your course by adding upsells, coaching tiers, or affiliate programs. Review funnel metrics, refine messaging, and plan future launches or new course topics based on demand.
What to Do Next
Start with Phase 1 and work through one phase at a time. Do not skip ahead.
If you want support, you can download the Editable Launch Checklist designed to help you plan your course launch step by step.
If you are feeling overwhelmed, you do not have to do this alone. Book a free audit, and I will help you map out your entire launch strategy, build your funnel, or handle the tech so you can focus on teaching.